
Most of your plumbing is hidden—under floors, behind walls, or in crawl spaces. You usually don’t think about it until something goes wrong: a clog, a weird smell, or worse—a leak. In a small cabin, where space is tight and structures are lightweight, drainage issues can quickly turn into big problems. They don’t just ruin your day—they can damage the foundation or affect your indoor air quality.
The good news? With early detection, most drainage problems are fixable without expensive repairs. This guide gives you a clear maintenance checklist—broken down into monthly, quarterly, and yearly tasks—to help you stay ahead of trouble.
We’ll also show you how using a drain camera lets you see what’s going on deep inside your pipes, so you can catch issues before they get serious.
Why Is Drainage System Maintenance so Important?
Here’s the deal: Your cottage’s plumbing is on a tight leash. With pipes packed in tight spaces, there’s zero room for error. One small clog can quickly snowball into a full-house plumbing nightmare, bringing your daily life to a screeching halt.
And it gets worse. A slow leak is your home’s silent enemy. It can rot precious wood floors, weaken beams, and create the perfect breeding ground for toxic mold. This isn’t just about a repair; it’s about protecting your investment from serious structural damage.
Let’s talk cost. Emergency plumber calls? They cost an arm and a leg, and you might be stuck waiting for days. A little bit of DIY vigilance—catching small issues early—can save you a ton of cash and a massive headache down the road.
Bottom line: Regular drain maintenance isn’t just a chore; it’s the smartest, cheapest insurance policy to protect your cabin, your wallet, and your peace of mind.
The Parts of Your Cabin’s Drain System & Common Problems
Before we jump into the maintenance checklist, let’s do a quick tour of your drainage dream team.
Inside Your Cabin:
- Fixtures: This is where it all starts—the kitchen sink, bathroom vanity, shower drain, and toilet. All of their pipes eventually meet up into one main stack.
- P-Trap: That U-shaped pipe under every sink? That’s your P-trap. It’s your first line of defense—it holds a seal of water to block nasty sewer gases from creeping into your home.
- Vent Pipe: This unsung hero pokes out of your roof. It regulates air pressure in the pipes to prevent slow drains and those annoying gurgling sounds.
- Cleanout: This is your best friend. It’s a capped pipe giving you direct access to the main line. This is your entry point for clearing clogs or conducting a quick inspection.
Outside Your Cabin:
The main line runs from the house to either the city sewer main or your septic tank. Some systems include a dry well or graywater recycling.
Common Trouble Signs:
- Slow Drains or Backups: The most common red flag that a clog is forming.
- Persistent Foul Odors: Often a sign that a P-trap has dried out or there’s a broken seal.
- Leaks & Loose Joints: Drips under sinks or in crawl spaces can lead to big water damage.
- Intruding Tree Roots or Pipe Collapse: The worst-case scenario, often requiring professional repair.
Catching these issues early usually means a simple, inexpensive fix. Ignore them, and you could be facing a massive (and massively expensive) repair project down the road.
How to Properly Use a Drain Inspection Camera (A Step-by-Step Guide)
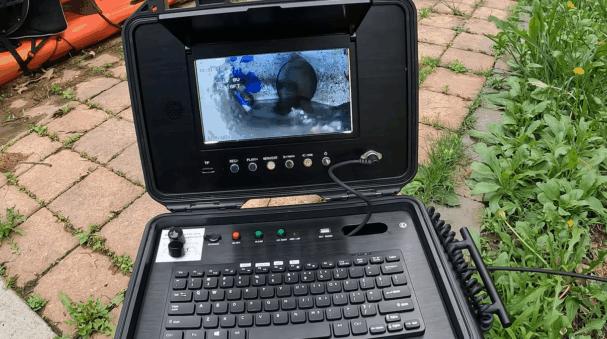
Many homeowners are unfamiliar with drain inspection cameras, but using one is easier than you might think. Here’s a clear breakdown of the key steps to effectively inspect your pipes.
What You’ll Need:
- Gloves
- Safety glasses
- Rag or towel
- Bucket
- Flashlight
Step-by-Step Instructions:
- Perform a Baseline Test: Run water or flush the toilet to observe how quickly it drains. This helps you understand the severity of the issue.
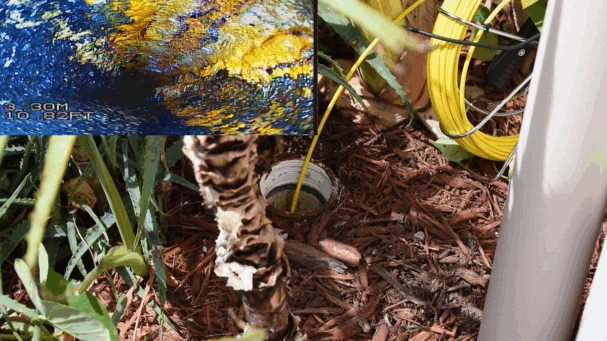
- Access the Pipe: Locate the cleanout access point. Carefully insert the plumbing camera head and slowly feed the cable into the pipe.
- Inspect the Video Feed: As you guide the camera, keep an eye out for:
- Standing water or sagging sections (often called “bellying”)
- Misaligned joints, cracks, or breaks
- Root intrusion or foreign objects
- Build-up, corrosion, or deterioration along pipe walls
- Mark the Location: Most cameras include a distance counter. Use it to note exactly where problems are located.
- Document What You Find: Take photos or record video through the camera.
This provides valuable evidence if you need to call a professional—saving time and diagnostic costs.
When to DIY vs. Call a Pro for Drain Issues?
Wondering whether to tackle a drain problem yourself or call in the experts? Here’s a clear guide to help you decide.
When You Can DIY:
- Minor clogs caused by grease or hair can be cleared with a drain snake or plunger.
- A clogged P-trap that can be easily disassembled and cleaned by hand.
- Small leaks around joints often just need tightening or a new seal.
When It’s Time to Call a Professional:
- Recurring blockages in the main sewer line.
- Suspected tree root intrusion into the pipes.
- Misaligned, collapsed, or broken piping.
- Septic tank failure, overflow, or signs of collapse.
Pro Tip: Even if you end up calling a pro, providing a video from your drain inspection camera can help them quickly pinpoint the issue—saving you time and diagnostic fees.
Common Mistakes & Safety Tips
- Avoid harsh chemical drain cleaners – they can corrode pipes and damage seals over time.
- Don’t use excessive force with tools—aggressive snaking or jetting can harm older, fragile pipes.
- Wear protective gear – always use gloves and safety glasses when inspecting or cleaning drains.
- Keep annual video records of your drain system – it helps track changes and catch problems early.
Pro Tip: Even if you end up calling a pro like the team from 1tomplumber.com, providing a video from your drain inspection camera can help them quickly pinpoint the issue—saving you time and diagnostic fees.
Summary
Living in a cabin may seem simple, but the health of your drainage system is what truly determines your comfort. By combining monthly quick checks, quarterly partial camera inspections, and an annual full scan, you can greatly reduce the risk of small issues turning into major disasters.
If “cleaning the filter” is the first step in routine maintenance, then a drain inspection camera is your key tool for entering the era of visual maintenance. It lets you see inside, document conditions, and make informed decisions—turning “hidden risks” into “manageable assets”.
Want Easier Control over Your Cabin’s Drainage System?
Check out real video examples captured with the SANYIPACE Drain Camera. It clearly reveals details even in dark, narrow pipes, making maintenance simpler and more cost-efficient.