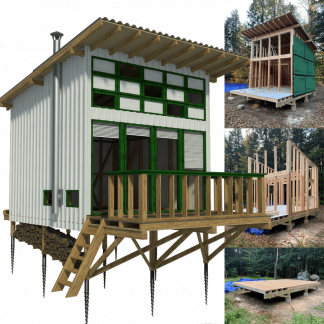
The thought of building your own cabin can be really tempting. There’s something appealing about skipping the mortgage, working outdoors on weekends, and ending up with a home you built yourself.
But here’s the thing — it’s not as straightforward as it seems. Financing an owner-built cabin is quite different from getting a loan for a typical suburban home. Many conventional lenders avoid these kinds of projects altogether.
Rural construction costs can also rise quickly and unexpectedly. If you don’t plan your finances carefully, that dream retreat could end up putting a real strain on your savings.
The Hidden Costs of Raw Land
Building a cabin without getting into financial trouble requires a realistic budget. You have to clearly separate needs from wants. Begin by working out the full cost of the shell — things like lumber, roofing, windows, and the foundation. After that, triple whatever contingency amount you first thought of.
Also, keep in mind that most first-time builders underestimate labor. Even when you’re doing it yourself, your time costs money. Factor in the income you’ll miss during the months you’re fully focused on building.
Furthermore, rural properties often require expensive site work:
- Well drilling: 5,000–15,000
- Septic system installation: 6,000–20,000
- Electrical line extension: $10,000+ per mile from the nearest pole
If you are looking to cut these land acquisition costs dramatically, an alternative path is to avoid paying retail prices for raw land. Platforms like ForeclosureHub offer a way to explore distressed property options, allowing you to find discounted lots or tax-delinquent parcels that can reduce your upfront cash outlay by 30–50%.
This shift from buying premium land to finding financial-distress bargains is often the single most effective move in a DIY cabin budget.
Creating a Phased Construction Budget
Once the land is yours, the next big piece is getting your construction budget right. Too many first-time builders blow their entire budget on the outside shell. They finish a good-looking exterior, only to discover there’s no money left for the rest of the work.
You can avoid this problem by using a staged budget. Break it down into these main phases:
- Phase 1: Weather-tight shell and rough utilities (foundation, framing, roofing, windows, doors, and basic electrical/plumbing).
- Phase 2: Interior insulation and drywall (insulation, vapor barrier, drywall, taping, mudding, sanding).
- Phase 3: Finishes and fixtures (flooring, cabinets, countertops, plumbing fixtures, lighting, wood stove).
Here’s the important part: If money runs out after Phase 2, you can still camp there. If it runs out in Phase 1, you’re stuck with a shell that won’t keep you warm in winter.
DIY vs. Hiring Pros: The Financial Reality Check
It’s important to think carefully about where DIY actually makes sense and where it’s smarter to bring in professionals. While you can save money on labor by doing things yourself, certain jobs carry risks that can quickly turn into big expenses.
Foundation Work: Extreme Risk
Getting the foundation wrong is one of the most expensive errors you can make. Fixing a bad pour can easily run you $20,000 or more to rip out and redo. In most cases, it’s simply cheaper to hire an experienced concrete crew right away instead of dealing with the headache and cost of fixing it later.
Electrical Wiring: High Risk
Electrical work is another area where mistakes get costly fast. Bad wiring usually fails inspection, forcing you to rip open finished walls.
In many cases, paying a licensed electrician for just a couple of days ends up being cheaper than fixing several weeks of your own faulty work.
Plumbing Rough-In: Medium Risk
A small leak behind finished walls can rot studs, grow mold, and require demolition to reach the problem. If you attempt this yourself, pressure-test every joint before closing up any wall.
Interior Painting: Low Risk
The worst outcome here is wasted paint and a few extra hours of work. Feel free to tackle this job yourself to save money.
Be honest about your skills. Similarly, renting professional-grade equipment, such as a mini-excavator for trenching, is almost always cheaper than hiring a full crew. Just watch YouTube tutorials first to avoid rookie digging errors.
Building a Cash-Only Contingency Fund
Finally, no DIY cabin financial plan is complete without addressing the lending problem. Banks rarely issue construction loans for owner-built projects unless you have a general contractor’s license. This means you will likely be paying in cash. Establish a dedicated cabin bank account and fund it with:
- Total estimated build cost (materials + hired pros + permits)
- Plus 30% contingency (for hidden rot, weather delays, price hikes)
- Plus 6 months of living expenses (so you don’t need to rush the build)
If your numbers don’t close, consider starting smaller. A 200-square-foot dry cabin (no plumbing) is far cheaper to finish than a 1,000-square-foot log home. You can always add a sleeping loft, a screened porch, or a second room next year. Financial freedom in the woods is built one pay-as-you-go board at a time.
Conclusion
DIY cabin builds can pay off, but only with solid financial planning. The excitement fades fast when you run short on money mid-project or face high, unexpected costs like a well.
Buy the land first at a good price by looking for distressed properties. Divide the build into phases and finish each stage before starting the next. Be realistic about your abilities — it’s usually better to hire pros for the foundation, electrical, and septic systems, since fixing errors later is costly.
Without bank financing, everything has to be paid for in cash. So put together a contingency fund before you dig the first hole. Most important of all — start smaller than you want. A completed 200 sq ft cabin beats a 1,000 sq ft unfinished shell every time.
The land will still be available later. Your savings might not be if you rush in without planning. Build slowly and sensibly. When you finally stay there for the first night with no mortgage hanging over you, you’ll see it was the right approach.