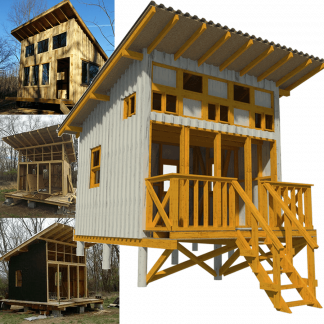

When building a small home, comfort isn’t just about square footage—it’s about what you hear (or don’t). Poor noise control can turn even the most beautifully designed space into a stressful environment. That’s why acoustic planning needs to be part of the blueprint, not an afterthought.
In compact homes, where rooms are closer together, and materials are used more efficiently, sound has fewer places to go—and more chances to bounce or travel through walls. The good news? With smart planning and the right materials, you can drastically reduce noise from outside, between rooms, and even through HVAC systems. That’s where details like soundproofing panels, insulation placement, and framing methods start to really matter.
Let’s break down how to build for peace and quiet—right from the foundation up.
Understanding Sound Transmission in Small Structures
Sound moves through air and solid materials. In small homes, with thinner walls and less separation between living areas, this transfer happens faster and more noticeably. Footsteps upstairs, a TV in the next room, or even passing traffic can become daily annoyances if not addressed during construction.
There are two types of sound you’re dealing with: airborne (like voices or music) and structure-borne (like footsteps or plumbing noise). Good acoustic planning tackles both.
Planning Your Build with Acoustics in Mind
Addressing noise starts with how—and where—you build. Here’s how to think about acoustics from the ground up.
Site Selection and Orientation
If you’re still picking your lot, consider natural sound factors. Is it near a road, train line, or business? What are the wind patterns? How much vegetation or topography buffers the area?
Try orienting bedrooms and quiet zones away from noise sources. Use garages, closets, or storage rooms as acoustic buffers on noisy sides of the home.
Foundation Considerations for Sound Control
The type of foundation you choose affects how sound moves through the structure. Slab-on-grade can transfer vibrations easily, while crawl spaces and basements allow for more insulation and damping below the floor.
Floating floors or decoupled framing methods can reduce structure-borne sound traveling up from the base of the home.
Structural Design Elements That Reduce Noise
Every framing decision influences acoustics. Double-stud walls, staggered stud framing, and resilient channel systems are all techniques that break the path of sound. These designs create air gaps or flexible connections that absorb or redirect vibration instead of transmitting it.
Also, aim for symmetry and avoid long, uninterrupted wall or ceiling spans. These act like drums, amplifying sound if not broken up or treated correctly.
Wall Construction Techniques for Maximum Sound Blocking
Your walls are the first line of defense. Done right, they’ll keep sound where it belongs.
Choosing the Right Framing Methods
Standard 2×4 framing gets the job done structurally but not acoustically. For better results, consider:
- Staggered stud walls: eliminate direct pathways for sound.
- Double stud walls: create a cavity between wall faces for added insulation and isolation.
- Resilient channels: metal strips that separate drywall from studs, reducing vibration transfer.
These options might cost a bit more upfront but save you years of noise frustration.
Insulation Materials That Work Double Duty
Not all insulation is created equal. Fiberglass batts are common, but dense materials like mineral wool (rockwool) perform better at both thermal and acoustic insulation. They fit tightly into stud bays, resist air flow, and absorb sound energy.
Spray foam can also help, especially for sealing small air gaps—but don’t rely on it alone for soundproofing. It’s more about airtightness than full acoustic isolation.
Drywall Installation Best Practices
Use double layers of drywall with Green Glue or a similar damping compound between them. This adds mass and dissipates vibration. Offset seams between layers to avoid creating sound “tunnels.”
Seal everything. Every gap, hole, or penetration is a weak point. Use acoustic caulk around electrical boxes, pipes, and corners.
Effective Soundproofing Solutions During Construction
Addressing sound at the construction stage saves money and headaches later. Here’s how to build quieter walls, ceilings, and floors before the drywall even goes up.
Interior Wall Treatment Options
Once the framing and insulation are in place, it’s time to layer on sound control. One of the most effective methods is applying soundproofing panels or mass-loaded vinyl (MLV) between the drywall and studs. These add mass and density—two key factors in blocking airborne noise.
For even better results, apply acoustic caulk along all edges before sealing up the wall. This prevents leaks that can undo all your work.
Acoustic Underlayment Beneath Flooring
Adding an acoustic underlayment under laminate or hardwood flooring helps absorb impact noise before it travels through the structure.
Resilient Ceiling Channels
Installing resilient channels between ceiling joists and drywall breaks the vibration path, significantly reducing sound transfer from above.
Double-Layered Drywall with Green Glue
Using two layers of drywall with a damping compound like Green Glue between them adds mass and dissipates vibrations, improving ceiling sound isolation.
Mineral Wool Between Floor Joists
If you’re working with exposed floor joists, packing mineral wool insulation between them adds effective sound absorption without changing the floor’s height.
Window and Door Sealing Strategies
Doors and windows are two of the biggest culprits when it comes to noise leaks. Use solid-core doors instead of hollow-core options. Add weather stripping around all four sides, and don’t forget door sweeps at the bottom.
For windows, double-pane or laminated glass performs much better than single-pane. Use acoustic-grade sealants around the window frame, and avoid installing them flush with exterior walls—recessed placement reduces noise penetration.
HVAC and Electrical Planning for Quiet Operation
You might not see these systems, but you’ll definitely hear them if they’re not planned with acoustics in mind.
Ductwork Design That Minimizes Noise
Use flexible ductwork where possible, and avoid straight-line runs. Bends and curves help break up sound waves and reduce how far mechanical noise travels.
Line ducts with acoustic insulation or opt for insulated ducting from the start. Place returns and vents away from sleeping or quiet areas, and avoid sharing duct runs between noisy and quiet zones.
Electrical Box Placement and Sealing
Electrical outlets and switch boxes interrupt your wall’s soundproofing layer. Don’t place boxes back-to-back on opposite sides of the same wall. Instead, stagger them or offset them to different studs.
Seal all boxes with acoustic putty pads or apply sound-dampening backer boxes. These small upgrades prevent sound from slipping through the wall cavity.
Quiet Equipment Selection
A whisper-quiet HVAC system or ductless mini-split may cost a bit more but pays off in day-to-day peace. Same with appliances—look for dishwashers, fridges, and laundry units with low decibel ratings. Every quiet machine is one less source of frustration in a compact home.
Exterior Noise Barriers and Landscaping
Don’t underestimate your yard. It can act as the first barrier against outside noise—if designed correctly.
Fence Design for Sound Reduction
Standard wood fences do little against sound unless they’re sealed and built with mass. Go for solid, overlapping boards, ideally with no gaps. Add mass-loaded vinyl to the back for added sound control.
Masonry walls work even better but cost more. If you’re DIYing, focus on building a tall, dense, and airtight structure.
Natural Sound Barriers with Plants
Thick hedges, trees, and layered landscaping absorb and scatter sound. They won’t block it entirely, but when combined with a solid fence, they make a noticeable difference.
Use fast-growing evergreens like arborvitae or bamboo for visual and sound privacy. Add raised beds or berms to elevate plantings for better coverage.
Building Orientation and Buffer Zones
Position your home so that utility areas—like bathrooms, closets, or garages—face the street or noise source. These rooms act as natural buffers for your quieter zones.
Leave space for landscaping and fences to do their job. Even a 5-foot buffer between your wall and a thick row of shrubs can soften outdoor sound significantly.
Interior Finishing Touches for Acoustic Comfort
The final layer in a quiet home? Smart interior finishes that support the soundproofing you’ve already built in.
Flooring Choices That Absorb Sound
Hardwood looks great but reflects sound. If you’re using it, add thick rugs and underpadding to minimize echo. For better acoustic performance, consider:
- Cork flooring – naturally sound-absorbent and soft underfoot
- Carpet tiles – easy to install and great for high-traffic areas
- Rubber flooring – ideal for home gyms or studios
Cabinet and Built-in Installation Tips
Cabinets and built-ins can become amplifiers if attached directly to hollow walls. Use rubber isolators or foam gaskets to reduce vibration. Avoid over-tightening hardware and use soft-close mechanisms to reduce impact noise.
Install bookshelves or wardrobes along shared walls to add mass and help block noise passively.
Walk through with a focus on gaps. Door frames, outlet covers, trim, and baseboards can all allow sound to leak through. Use acoustic sealant in any visible seams or cracks. Check thresholds, door sweeps, and vent covers one more time before calling it done.